Windows 平台使用 hexo 搭建个人博客
Windows 平台使用 hexo 搭建个人博客。
既学了 git 和 github 的用法,也熟悉了 nodejs。
又多了一项打发业余时间的软技能。慢慢地变成硬技能,何乐而不为?
如果你从旧版本 Next 主题升级上来,请戳这篇 issues,相信会对你有所帮助:
https://github.com/next-theme/hexo-theme-next/issues/4
Windows 平台使用 hexo 搭建私人博客
必备环境(Windows):
Nodejs:https://nodejs.org/en/(hexo 官方建议:Node.js 版本需不低于 10.13,建议使用 Node.js 12.0 及以上版本。)
提醒:Node.js 14.0版本在运行hexo服务时会出现警告,但不影响使用,也可以升级更高版本。
1
2
3
4
5
6
7
8
9
INFO Start processing # 使用nodejs 14.0出现警告,搜索后发现基本是让降版本至nodejs 12.0
INFO Hexo is running at http://localhost:4000 . Press Ctrl+C to stop.
(node:4464) Warning: Accessing non-existent property 'lineno' of module exports inside circular dependency
(Use `node --trace-warnings ...` to show where the warning was created)
(node:4464) Warning: Accessing non-existent property 'column' of module exports inside circular dependency
(node:4464) Warning: Accessing non-existent property 'filename' of module exports inside circular dependency
(node:4464) Warning: Accessing non-existent property 'lineno' of module exports inside circular dependency
(node:4464) Warning: Accessing non-existent property 'column' of module exports inside circular dependency
(node:4464) Warning: Accessing non-existent property 'filename' of module exports inside circular dependencyGit:https://git-scm.com/downloads(个人使用版本:git version 2.31.1.windows.1)
Hexo:https://hexo.io/zh-cn/docs/github-pages(个人使用版本:6.3.0)
友情提醒:如果只是想简单发点私人博客,landscape 主题完全可以满足。
如果想看简洁的界面,又想有许多新功能,那就使用 Next 主题,这款主题持续更新。
一 安装hexo
01 使用npm安装hexo环境
1 | npm install -g hexo-cli #使用npm安装Hexo-cli |
做完上面操作,恭喜你可以进行初始化安装blog文件了。
02 初始化博客(blog)目录
1、进入d盘(Windows terminal 下打开 cmd 或者 powershell)
1 | cd d: |
2、 创建hexo目录,方便自管理,知道这是使用hexo搭建的博客
1 | mkdir hexo |
3、 切换到hexo目录
1 | cd hexo |
4、 初始化blog目录,如果速度很慢,建议替换为国内镜像源地址
1 | hexo init blog |
5、 新增md文件
1 | hexo new "hello my blog" |
生成md(markdown)文件所在目录:source
6、 生成静态文件
1 | hexo g |
生成静态文件所在目录:public
7、 启动服务
1 | hexo s |
或者指定 ip 地址和 port(端口)
1 | hexo clean && hexo s -i 192.168.0.233 -p 4001 |
二 切换 nodejs 镜像源
nodejs 临时配置国内 taobao 镜像源。
npm 镜像源地址,国内镜像站:
https://npmmirror.com/
nodejs 临时配置国内 taobao 镜像源:
npm config set registry http://registry.npm.taobao.org/
三 安装插件(进阶)
如果你会一丢丢前端(nodejs)知识,对这些插件使用会很顺手。
1、 安装hexo插件(Next主题)
1 | npm install hexo-xxx-xxx --save |
安装插件目录:node_modules
比较实用的几个插件:部分对landscape适用,主要是对Next主题适用。
- hexo-auto-excerpt:配置阅读全文功能,主页实现折叠效果(或者使用手动截断:)。
- hexo-generator-sitemap:Next主题配置站点。
- hexo-leancloud-counter-security:配置博客阅读次数,需要在leancloud注册并配置应用凭证、结构化数据。
- hexo-generator-searchdb:Next主题配置本地搜索,注意在hexo中也需要配置。
这里只详细介绍主题配置自动阅读(landscape和Next都适用):
1 | # 1. 在主题(Next或者landscape)中设置_yaml.config配置文件,添加如下配置文件 |
cmd命令执行以下命令:
1 | # 2. 测试效果(Windows下使用cmd命令) |
测试访问:
http://localhost:4000
2、 主题目录
主题所在目录:themes
获取Next主题:使用 git clone 或者直接下载
git clone git@github.com:next-theme/hexo-theme-next.git
https://github.com/next-theme/hexo-theme-next/archive/refs/heads/master.zip
下载后复制到themes目录,然后修改hexo配置文件_config.yml:
1 | # Extensions |
如果使用 npm 命令安装 next 主题:
1 | npm install hexo-theme-next --save |
在 hexo 配置,需要变动:
1 | theme: next |
还需要复制一份配置到 blog 根目录:
1 | cp .\node_modules\hexo-theme-next\_config.yml ._config.next.yml |
3、 hexo配置文件
blog目录下配置文件: _config.yml
介绍一些使用比较多的参数:更多请参考 hexo 或者 Next 主题文档
1 | # Site #站点配置 |
4、 主题配置文件
themes目录landscape主题(hexo默认主题): _config.yml
themes目录next主题hexo-theme-next: _config.yml
Next主题仓库:
https://github.com/next-theme/hexo-theme-next
主要介绍一些个人配置Next主题重要部分:根据使用经验加了注释
1 | menu: #菜单配置 |
更多配置说明,请参考Next主题文档介绍:
https://theme-next.js.org/
四 发布至github pages
1、 发布至github pages
前提:已经配置 git 环境(本地生成ssh公钥,然后配置到github)
如果你还没自己的 github 账号,也没配置 git 环境,可以参考我的历史博客:git推送项目到github并使用gitee做镜像仓库,如果图片被防盗链了,还可以在我的公众号上搜索查看。
也可以配置 deploy 一键发布,需要配置 github 私人令牌 token。
个人推荐使用 cp 命令将 public 目录下生成的静态文件复制到你的 repo(仓库),然后提交到远程仓库,这样操作更灵活一点。
如下为提交至远程仓库详细步骤:
1 | mkdir github # 1. 创建github目录,用于存放(检出)自己的远程仓库 |
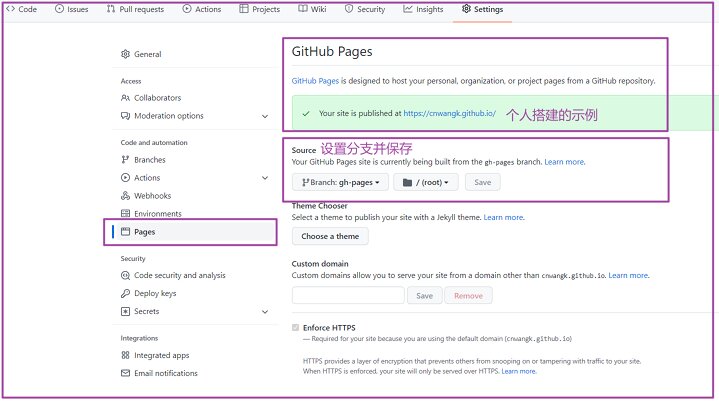
做完上面提交操作,还需要给github仓库配置github pages服务。
github pages的配置页面:
https://github.com/cnwangk/test/settings/pages
我测试配置了一个仓库:2022最新版github pages配置界面
注意:仓库必须是公开的(public)、然后仓库命令可以命令为用户名加github.io。
默认进入一个设置好的gh-pages分支的仓库这样显示内容的:将gh-pages设置为默认仓库。
Custom domain:配置域名,比如userName.github.io之外的域名。

2、访问验证博客
1 | https://yourUserName.github.io |
可以访问我搭建好的示例:
https://cnwangk.github.io/
五 hexo帮助命令
1、 进入blog目录(cmd命令窗口)
1 | cd blog |
2、 执行帮助命令
对使用比较有帮助的命令,根据个人实际使用经验,做了中文注释。
1 | D:\hexo\blog>hexo --h #查看帮助命令,使用Next主题 |
六 个人配置示例效果
莫问收获,但问耕耘
养得胸中一种恬静
以上就是本文的全部内容,希望能对你的工作与学习有所帮助。感觉写的好,就拿出你的一键三连。在公众号上更新的可能要快一点,目前还在完善中。能看到这里的,都是帅哥靓妹。如果感觉总结的不到位,也希望能留下您宝贵的意见,我会在文章中进行调整优化。
tips:使用hexo搭建的静态博客也会定期更新维护。
以上总结,仅供参考哟!希望对你有所帮助。
—END—